2009年3月7日 星期六
2009年3月4日 星期三
GyroBot 900
I have my GyroBot 900 installed and primarily tested, easy set up, more to come
I am working on a Set up guide in my site www.Heli-RND.com
I am working on a Set up guide in my site www.Heli-RND.com
2009年1月2日 星期五
First flight/crash 2009
Today is my birthday, not a PH but I took the day off; ,my lovely wife allowed me to be in the field till 1630 hrs..... Yahoooo.
Arrived at 0930, only me in the field, couple of coach drivers gathered around me asking about the hobby, tried to get rid of them ... a few flights and then two three buddies showed up, I had about nine flights, inverted hovering with shaky legs and .... during the ninth flight ... the 450 slowly tail drift and faster in two seconds, I hit the throttle hold quickly at about 20 feet off ground and it quietly landed on the side, nothing damaged then I blamed the DS 760 clone gyro (yeah yeah yeah, I am the dealer but I can not get one myself, one guy snatched two from me and threw me cash more than I would charge him ... but those were reserved for me and my daughter ....) anyway, I was thinking of getting a GY 401 from second hand market then I realized, the belt broken .....
Now I am fixing it and replacing the Hitec 65 mg with Hyperion HP-DS11-SCB than I bought for my new SJM 180, well they deserve to be on the 450 SK 360 equipped flybarless.... digital servo 0.13 sec/60 degree, that should make my flybarless flies better .... will post report in HeliFreak
2008年10月3日 星期五
Removal of blade grip bearings
This is not rocket science, not brute force but something hot.... fire
Heat up the grip on open fire, 15 seconds is good - Oh I forgot, this is done with long time training (burns and burns) kids do not do this without parental guidance, I am not in any way reliable for any damage or injury caused ....

Heat for approximately 15 second till seeing little bit white smoke. Use a 1.5 mm hex driver reach in to feel the edge of the bearing and gently push ... one done
 Now back to the stove for another 10 seconds and then the other side

Done

www.Heli-RND.com
Heat up the grip on open fire, 15 seconds is good - Oh I forgot, this is done with long time training (burns and burns) kids do not do this without parental guidance, I am not in any way reliable for any damage or injury caused ....

Heat for approximately 15 second till seeing little bit white smoke. Use a 1.5 mm hex driver reach in to feel the edge of the bearing and gently push ... one done
 Now back to the stove for another 10 seconds and then the other side
Done

www.Heli-RND.com
DS 760 ordered
Storm near Hong Kong, unstable weather postponed my Trex 500 SK 360 flybarless test flight....
Ordered 20 DS 760 over six months ago, now it is on the way, 8 gyro and four out of ten Flash Link Cables are gone even before I paid Angelos for the stock ...
 Check my site for more info
www.Heli-RND.com
Ordered 20 DS 760 over six months ago, now it is on the way, 8 gyro and four out of ten Flash Link Cables are gone even before I paid Angelos for the stock ...
 Check my site for more info
www.Heli-RND.com
2008年10月2日 星期四
SK 360 set up
Last night, I finished the mechanical modification and basic software set up tonight I am going to finish the rest prior to take off.
To remind myself .... every change must be saved into the gyro by pressing "F1" on the key board.
_________________________________________________________________
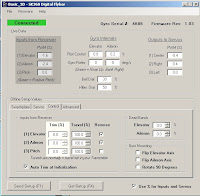
push the pitch stick to mid point and keep it there, check "input from receiver" area, then change the values in (Trim %) to make the "input from receiver" as close to zero as possible, do the same on elevator and aileron by pushing nose up/tail down and aileron right position
________________________________________________________________
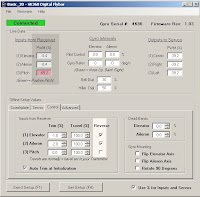
push the pitch to max, if the box is red in color, check or uncheck the relevant box in "reserve" to change it to green
___________________________________________________________________
 If the swashplate moves in wrong direction, change the sign in swash mixing as you would do in the transmitter to change this.
This swash mixing is same as the one in transmitter but best to keep value below 60.
_________________________________________________________________
Now, push the Elevator to tail down/nose up position and Aileron right to set up as the pitch stick
____________________________________________________________________
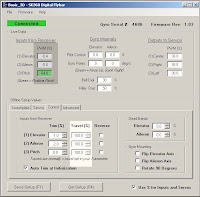
Check the "input from receiver", change the value in Travel % to achieve 100% at max pitch, nose up/tail down and aileron right position
____________________________________________________________________
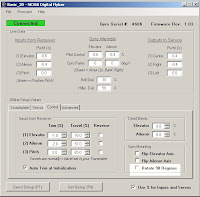
Since I installed the gyro with VR dials towards the tail, I checked the "Rotate 90 Degrees" box, same thing when the VR dials facing the nose, if else, the box should be unchecked.
____________________________________________________________________
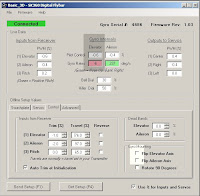
now it is time to set the sensor direction, I picked up the heli and tilt the nose up, the sensor box should be green, if red then, change the "flip elevator Axis". then tilt the heli right and do the same
______________________________________________________________
That was not even half an hour, the whole process is really self-explanatory, but I am a chicken ... I saved the set up into a file then unplug the USB. To be surely safe, I put the gyro back in flight mode, replug the battery and tilt the heli around.
Seeing the swash plate keeps leveling itself to the horizon, that looks like I set up the gyro right.
Now, all I need to do is wait for a flight test ...... seems there is typhoon coming and will rain cats and dogs over the weekend, I may need to wait for a while
To remind myself .... every change must be saved into the gyro by pressing "F1" on the key board.
_________________________________________________________________

push the pitch stick to mid point and keep it there, check "input from receiver" area, then change the values in (Trim %) to make the "input from receiver" as close to zero as possible, do the same on elevator and aileron by pushing nose up/tail down and aileron right position
________________________________________________________________

push the pitch to max, if the box is red in color, check or uncheck the relevant box in "reserve" to change it to green
___________________________________________________________________
 If the swashplate moves in wrong direction, change the sign in swash mixing as you would do in the transmitter to change this.
This swash mixing is same as the one in transmitter but best to keep value below 60.
_________________________________________________________________

Now, push the Elevator to tail down/nose up position and Aileron right to set up as the pitch stick
____________________________________________________________________

Check the "input from receiver", change the value in Travel % to achieve 100% at max pitch, nose up/tail down and aileron right position
____________________________________________________________________

Since I installed the gyro with VR dials towards the tail, I checked the "Rotate 90 Degrees" box, same thing when the VR dials facing the nose, if else, the box should be unchecked.
____________________________________________________________________

now it is time to set the sensor direction, I picked up the heli and tilt the nose up, the sensor box should be green, if red then, change the "flip elevator Axis". then tilt the heli right and do the same
______________________________________________________________
That was not even half an hour, the whole process is really self-explanatory, but I am a chicken ... I saved the set up into a file then unplug the USB. To be surely safe, I put the gyro back in flight mode, replug the battery and tilt the heli around.
Seeing the swash plate keeps leveling itself to the horizon, that looks like I set up the gyro right.
Now, all I need to do is wait for a flight test ...... seems there is typhoon coming and will rain cats and dogs over the weekend, I may need to wait for a while
2008年10月1日 星期三
Build Log of Flybarless Trex 500 with SK-360
WWW.Heli-RND.com
- the online shop I run at part-time hoping it will bring me to an early retirement, started with the Asian dealership for Skookum SK 360 flybarless device. Below logs the conversion of a Trex 500 for a friend of mine who bought three from me to fit into other than this 500, next will be Trex 700 and also a Trex 450 ___________________________________________________________________
Well, I would not mind taking this building fun from him ...

 Started with the rotor head, I removed the head from the heli. then removed the flybar assembly from the rotor head to make the head Flybarless ... these is what I do not need
____________________________________________________________________


To give the heli sufficient collective range, "Y" link on the washout mixing arm was moved from the short span to long side
___________________________________________________________________


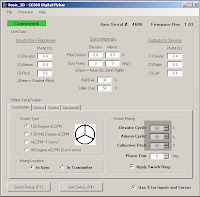
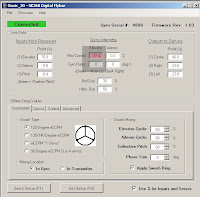
Unpacking the SK-360, I plug the gyro between the receiver and servos as laid in the manual, switching on the radio (Yes, this guy has a deep pocket), H-1 swash type was selected
__________________________________________________________________


All trims and sub-trims are set to zero
___________________________________________________________________

servo arms are centered via the software
____________________________________________________________________

Servo links are then adjusted to level the swashplate at zero pitch, it must be perfectly level so I used an excellent tool borrowed from a friend of mine
___________________________________________________________________

then the same is done at max and min pitch buth this time by use of the travel function in the software, it is difficult in this version of the software but the next one will allow individual travel setting at max and min
____________________________________________________________________

an additional main shaft collar (this is the only additional item) is added between the swashplate and washout bash to keep the washout (now follower) from moving
___________________________________________________________________

put the washout base (I forgot, it is now the follower to keep the inner swash rototing inline with the main shaft) back
____________________________________________________________________


and then the rotor head, please note the mixing arm on the flybar cage is now on the rotor head
___________________________________________________________________

Before I go to bed, I pushed the additional collar up against the rotor head and lock it, Loctite is used.
__________________________________________________________________
Well, mechanical part is finished ... carry on tomorrow with the software set up part....zzZZZ
If you want to know more about my business and other info I collected in my site, visit
WWW.Heli-RND.com
- the online shop I run at part-time hoping it will bring me to an early retirement, started with the Asian dealership for Skookum SK 360 flybarless device. Below logs the conversion of a Trex 500 for a friend of mine who bought three from me to fit into other than this 500, next will be Trex 700 and also a Trex 450 ___________________________________________________________________
Well, I would not mind taking this building fun from him ...

 Started with the rotor head, I removed the head from the heli. then removed the flybar assembly from the rotor head to make the head Flybarless ... these is what I do not need
____________________________________________________________________

To give the heli sufficient collective range, "Y" link on the washout mixing arm was moved from the short span to long side
___________________________________________________________________


Unpacking the SK-360, I plug the gyro between the receiver and servos as laid in the manual, switching on the radio (Yes, this guy has a deep pocket), H-1 swash type was selected
__________________________________________________________________


All trims and sub-trims are set to zero
___________________________________________________________________

servo arms are centered via the software
____________________________________________________________________

Servo links are then adjusted to level the swashplate at zero pitch, it must be perfectly level so I used an excellent tool borrowed from a friend of mine
___________________________________________________________________

then the same is done at max and min pitch buth this time by use of the travel function in the software, it is difficult in this version of the software but the next one will allow individual travel setting at max and min
____________________________________________________________________

an additional main shaft collar (this is the only additional item) is added between the swashplate and washout bash to keep the washout (now follower) from moving
___________________________________________________________________

put the washout base (I forgot, it is now the follower to keep the inner swash rototing inline with the main shaft) back
____________________________________________________________________


and then the rotor head, please note the mixing arm on the flybar cage is now on the rotor head
___________________________________________________________________

Before I go to bed, I pushed the additional collar up against the rotor head and lock it, Loctite is used.
__________________________________________________________________
Well, mechanical part is finished ... carry on tomorrow with the software set up part....zzZZZ
If you want to know more about my business and other info I collected in my site, visit
WWW.Heli-RND.com
訂閱:
文章 (Atom)


